
Building
Customized
Speakers & Making
Wired Speakers
Wireless

When you’re creating a home theater space, there’s so much you can do to put a personal stamp on it. While you’ll spend a lot of time (and money!) on your TV, home theater seats, and your surround sound system, there’s still much you can do to customize your home theater.
Customized speakers can help take your home theater space to another level, especially if you’ve decorated your room in a particular color or given your home theater a specific theme. Custom speaker cabinets can also bring extra life to your home theater if you cannot install your speakers into your walls, ceiling, and floor.
In addition to creating customized speakers, you might also be able to make your speaker system wireless. Taking this step will cut down the need to route wires around your home theater, disguise them with décor, or worse, having to have them on display!
In this guide, we’ll look at both how to create customized speakers and ways you can make your speaker system wireless.

How to build your
own custom speakers

Before we start to look into the process of building customized speakers, let’s look at why you might want to do so and what you can expect when embarking on your project.
The first things you need to think about is how long you have to dedicate to building your speakers and your budget.
While you can buy each component of a customized speaker system individually, it’s also possible to purchase speaker kits. These kits contain everything you need to build your speakers yourself. You might be able to find speaker kits for as little as $100. However, if you’re looking for something top of the range, a speaker kit might easily cost you a few thousand dollars.

As such, you might be better off buying your own components. When you do this, you will need to calculate all your speakers’ dimensions yourself, so consider buying a kit if you’re a beginner!
Whichever route you take, even spending thousands of dollars on a speaker kit or components is still likely to be cheaper than buying ready made speakers. After all, a top of the range speaker system for a home theater can easily stretch to tens of thousands of dollars! Depending on how much you’ve spent on your home theater already, you might find your budget demands you build customized speakers!
Before you get started, you’ll also need to make sure you have the below equipment, at least if you’re planning on building your speakers from scratch.


If you don’t have access to these or aren’t much of a DIY fan yourself, you can always buy a speaker kit and then pay someone else to put your speakers together, although this will mean you need to make your home theater budget stretch even further.
Let’s go through the process of choosing your kit and building customized speakers yourself. We recommend you read the full guide before getting started, as there are some optional steps as well as things you can do in a different order, depending on the approach you take to building your speakers.
The first step to building your speakers is choosing
The speaker kit you’re going to buy
The individual components you’re going to use
This guide is relevant whether you have purchased a kit or plan to purchase individual components individually and build customized speakers 100% from scratch.
However, this guide will walk you through as if you’re purchasing individual components. If you buy a kit, you’ll typically only have to build the speaker and not have to cut anything out or do any other “heavy” work.


For help choosing your kit and components, you’ll find a wealth of reviews online. Look out for prominent DIY speaker builders and give their opinions more weight.
Those guys know what they’re talking about and will point you in the right direction!
Think about the following, especially when considering the technical elements of the kit you’re buying:


Remember, your speakers can look amazing, but if you don’t have the right kit to produce the highest quality sounds, you’ll have a sub-optimal home theater experience.
design
If you’re buying a speaker kit, you might not need to worry too much about this, as you’ll be choosing a combination of design and technical gear when purchasing it.
However, if you’re buying individual components and building from scratch, you should speak to the vendor from whom you buy your technical components. Although their first specialty is speaker components, they’ll also have a great deal of knowledge about using cabinet design effectively.
At the same time, a low-quality cabinet can make your expensive speakers sound awful.
The main things you need to consider are:
As you can tell, you’ll need to do some prior planning, so you know exactly what you want!
If you’re building your first speakers, this will be enough to consider.
If you have some experience with building speakers, you might also want to consider:
- Rounding over corners Rounding over corners to reduce interference with your sound
- Building in horn-style structures Building in horn-style structures to act as built-in amplifiers
- Using line arrays Using line arrays to gain efficiency
- Eliminating Eliminating parallel faces.
speaker panels
Next, you need to choose your materials and mark and cut your panels.
Medex wood is ideal due to its heavy, dense, and moisture resistant properties. It’s kind of an upmarket MDF! However, if you can’t get your hands on Medex, or it’s out of your price range, you can still create fantastic speaker cabinets using MDF.
This may cause your budget to spiral, so as a minimum, aim for a 1.5-inch-thick front and a 0.75-inch thickness for the remainder of the cabinet. This will give you industry-standard speaker cabinets for your home theater system! If you’re buying a prefabricated speaker kit, check the thickness of the cabinet before you buy.

Plan your speakers out on paper, so you know how much Medex or MDF you’ll need. Once you have the wood, mark out the pieces you need on the wood, and cut your panels accordingly. When marking out the wood, use a piece of math equipment like a set square or even just a bit of card to ensure you get right angles – assuming you’re building square or rectangular speakers! When cutting, you should cut all panels simultaneously if possible, so you make them the same size.
When you have cut out your panels, double check your measurements are correct.
support panels
If you’ve only ever bought speakers from the electronics store, you might not know they had support panels inside!
However, these are a crucial element of your speakers, sitting inside to strengthen their structure while also helping dampen your cabinet’s interior further. You can typically cut these from 0.75-inch thick scrap material. You should ensure they have holes in them – think Swiss cheese! – so air can flow through your speaker cabinets.
It’s up to you how many support panels you build into your speakers. Typically, they’re placed closest to the woofers and at the midpoints of your side panels. As such, you may have between two and four depending on the size and construction of your speakers.
Use your cabinet’s measurements to calculate what size you need your support panels to be before cutting them out.

biscuit joints
This is an optional step, but one that’s worth doing to ensure your cabinet is even more robust.
It can also help you avoid potential issues with squaring up panels, which can happen if you rely solely on screws, nails, and glue.
Once you have them, you need to line up your panels as they’re going to sit when your cabinets are assembled and use a biscuit joiner to cut the necessary strips out of the wood. You can use as many biscuit joints as you wish, but two per join is typically sufficient.

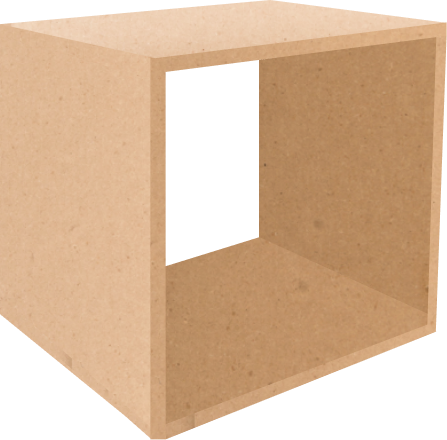
your cabinet
The first parts of the cabinet to assemble are the top, bottom, and sides.
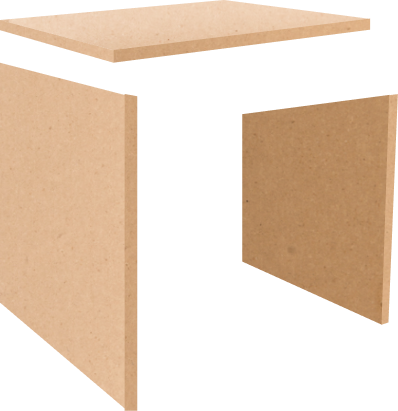
The best way to work here is to construct one cabinet at a time. Lay out the top, bottom, and sides of each speaker, and have your biscuits to hand if you’ve cut biscuit joints.
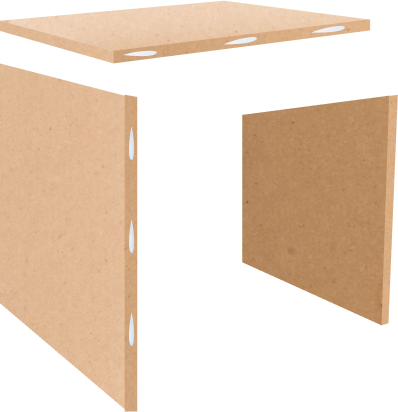
Run a thin line of wood glue along the edges of all sides that will come together
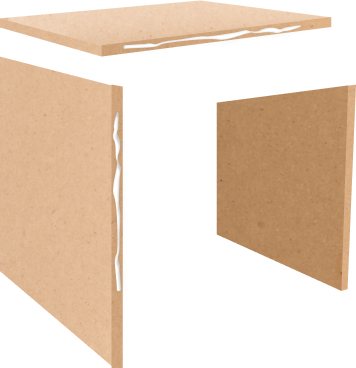
Use a brush to spread the glue evenly across the sides that will join. If you’ve cut biscuit joints, you should apply glue into the holes you’ve cut, too.
If biscuits don’t fit perfectly, throw them out and use a different one. This shouldn’t be anything for you to worry about; biscuits sometimes swell if they become moist or you’re in a humid surround.
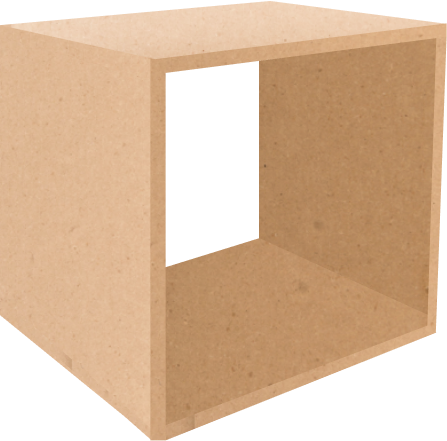
Whether or not you have biscuits, the next
step is to join your edges to faces and
construct your cabinet. This is where your
clamps will come in useful.
You will need to pull the cabinet together and apply even levels of
pressure to each joint. If you have used high-quality wood glue, you
won’t need to wait too long before you can loosen the clamps slightly,
allowing you to conduct the next actions.
measure your diagonals
First, use a tape measure to measure your
diagonals. If they’re unequal, adjust the clamps as
necessary, so you get a perfectly square cabinet.
sit flush against each other
Second, ensure all your cabinet panels sit flush
against each other. A dead blow hammer and
another block of wood are all you need, and you
can quickly ensure all edges are flush and you
have a perfect cuboid.
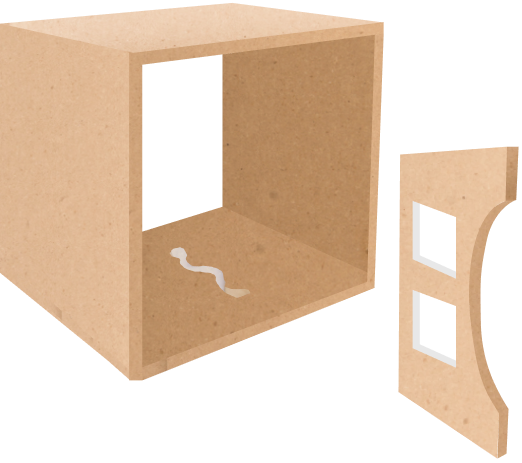
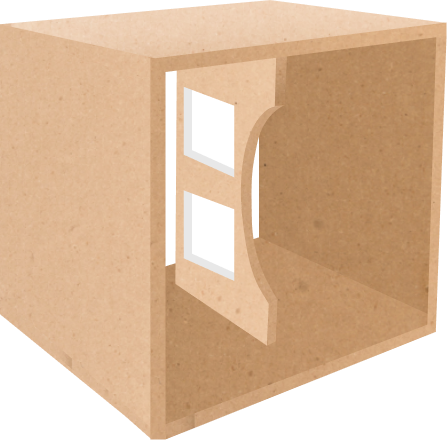
your drivers
You can now leave those to try and move onto dealing with your speaker cabinets’ front and back panels.
How you do this will depend on how experienced you are building speaker cabinets and your skill levels and confidence in DIY!
inexperienced
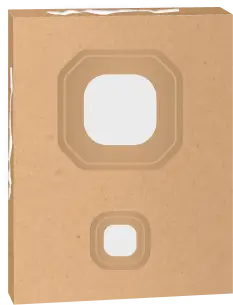
If you’re inexperienced, are building your first speaker, or aren’t confident with DIY, then cut out a hole in which you can mount your speaker driver.
more experienced
If you’re more experienced at building speakers, cut out a hole so that you can recess the drivers further into the speaker cabinet and have them flush with the front panel.
Create Marks on the
panel
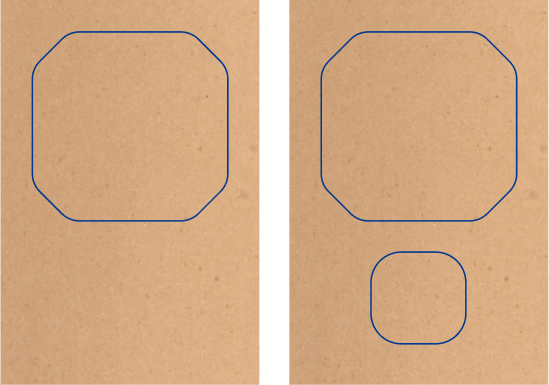
Cut out perfect circles
using circular jig saw
or a router
However, if you need to use a compass or even a screw or nail tied to a pencil on a piece of string, this works, too! So long as you make sure you have a perfect circle and that your speaker will fit, you can do this however you wish!
Don’t cut straight through your wood. Instead, cut several times, going a little further through the wood each time, until you’ve removed the necessary panel.

it’s worth cutting from within the circle you’ve drawn out towards the edges. As you get close to the outside, stop sawing and use sandpaper to finish the job to ensure you get a perfect circle.

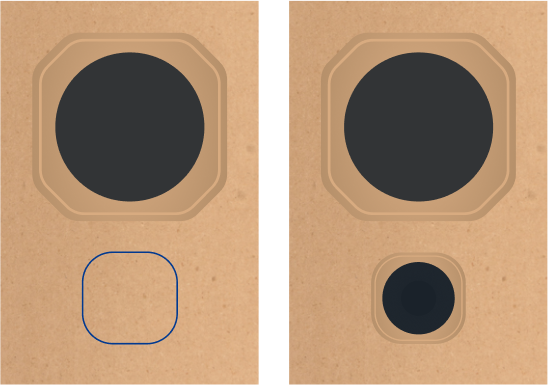
terminal cups & ports
You’re not done cutting holes just yet!
Next, use a drill or jig saw to cut out holes for your terminal cups and ports (if you’re using them).
Some ports will be fitted into your speaker cabinet, while others will need a full circle cut out of your rear panel so you can fit it.
You will know whether you need to do this from your conversation about building speaker cabinets when you bought your components.
and back panels
Remember the support panels you cut out at step four?
Once your top, bottom and sides are dry, and you’re happy that they’re square and flush, it’s time to glue in your support panels.
Do this by simply spreading glue around your support panels’ outside edges and sliding them into place. If you need to use clamps to push your sides together and hold your support panels in place, then do so.
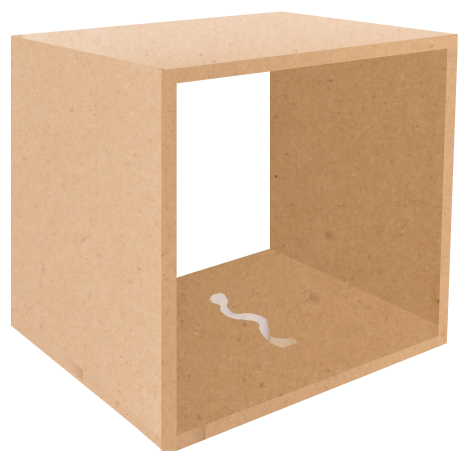
wooden glue
support panel
support panel in
wooden box
If you wanted to, you could glue your support panels when you do the top, bottom, and sides. The added benefit of doing this is that you can then use biscuits to support your support panels and make your speaker cabinet even more robust.
Once you have the supports in place, glue the back panel into place, again using clamps at equalized pressures to ensure the force is distributed evenly, and your speaker cabinets remain a perfect shape.
Once all the glue is dried, you need to add dampening material to your speakers.
This is another area where you’ll be able to pick up tips from your component vendor, and they may have even provided recommendations on what dampening material to use when you bought your kit.


In general, the more expensive the material you choose, the better dampening performance you’ll get. If you don’t select an adhesive-backed dampening material, use either hot glue or another construction adhesive to stick it onto your inner walls. Dampen as many of your speaker cabinet’s inner walls as you can, and remember to leave room for everything that will need to go inside.
your crossovers
Depending on your drivers, you may not need to use crossovers. If this is true for you, then skip past this step and onto the next one.
If you’ve bought a speaker kit, your crossovers might already be done for you, or at the very least, you’ll have the wiring plans included.

the best approach is to buy crossovers that are already put together for you. If you put your crossovers together yourself, you’ll find yourself soldering electrical components and gluing them onto wooden boards.
We suggest paying more for better quality crossovers and parts to give yourself the best possible sound experience.
Whichever approach you take, when your crossovers are complete, you need to secure them to the inside of your cabinet. Pull your wires into position so you can quickly hook up your drivers later.
With everything in place, you can now glue the front panels onto your speakers.
Do as you’ve done when gluing other parts of your speakers together. Spread a thin layer of glue across the surfaces you’re going to connect and use clamps to seal into place. For the final time, ensure your edges are flush.
Use glue and clamp for the front panels to fix
them with other panels
Before doing this, ensure you have everything inside the cabinet that needs to be in there. Once the front panel is on, it’s hard work to get it off and do anything without tearing up your cabinets and starting again!
Once your cabinets are complete, you might have hardened glue around the outside of your joints. Use a sander to take off the glue and even off anything that isn’t quite perfect.
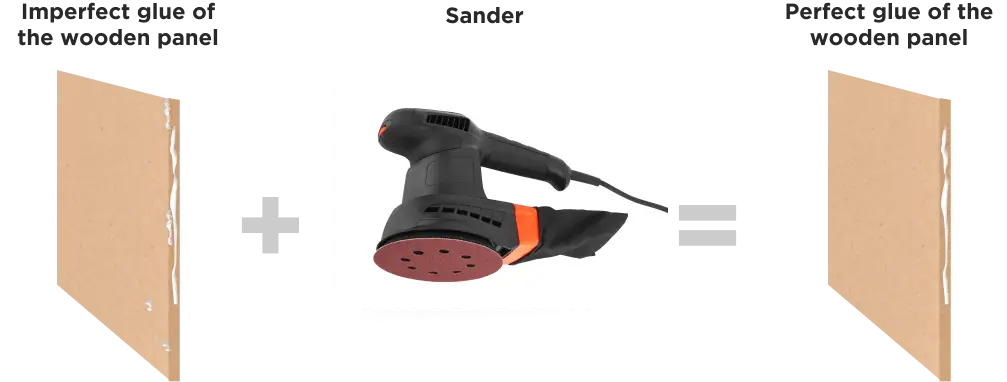
Be careful when you’re doing this! Regardless of your cabinet walls’ thickness, sanding off too much will leave your speaker cabinets less than perfect. That’s the last thing you want after all the work you’ve put in to get to this stage!
Make sure you only sand one edge at a time, and don’t sand around the corners!
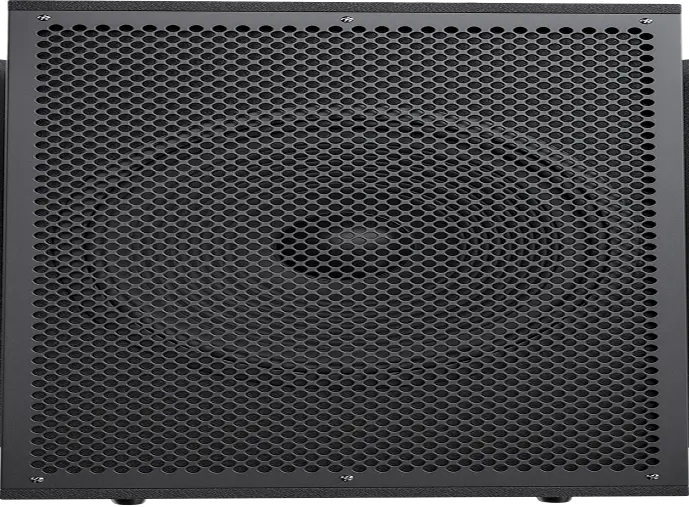
speaker cabinets
The final step before you install your speaker components and test out your speakers is to finish them.
It’s really up to you how you go about this. Typically, speaker cabinets are finished with a wood veneer that has a varnish or similar applied. However, you might opt for colorful paint, leather exterior speakers, or whatever else you need to do to make it suit your personal style, as well as ensure they’re going to look fantastic in your home theater space!


If your speakers will be floor standing, you’ll need to install cabinet feet or spikes to the base of your speakers, too. You can get these that glue onto your speakers’ base, or you can drill holes in the corners and use screw-in spike sleeves.
components
Nearly there! The next stage is to install all your speaker components.
First, position your terminals and mark drill holes where the screws need to go.


Then, drill your holes and screw your terminals into place. If you drilled a hole because you’re using a port tube, you can simply hammer this into place.
Next, mark and drill your holes for your speaker drivers. You’ll need to solder the leads from the crossovers you bought or made earlier to the metal tabs on your driver.


Make sure you match your crossover leads to the correct negative and positive tab from your driver!
The positive tab will typically carry a red dot and be marked with the “+” symbol, and be the larger of the two. The negative tab is smaller and usually won’t have any mark other than the “-” sign.
Once you’ve done this, push excess wiring into the cabinet, and screw your speakers into place. Remember, this is the front of your speaker cabinet, so ensure you use good quality and relevant color screws!
The final step is to install your subwoofer driver and plate amp. You need to connect your speaker wires to the posts on the back of the amp before screwing your amp into place in the remaining hole of your back panel. When feeding your wires through the speaker cabinet, it’s worth tying them around your support brackets to reduce slack. Twist the wires around the subwoofer leads and solder them into place.
Finally, drill holes so you can install the subwoofer and screw this into place.
speakers
Even if you plan to make your new customized speakers wireless eventually, you should make sure they work after you’ve built them!
Hook them up to your home theater system (or even a music system if you want to do a quick check before fully installing them) and play a familiar movie or music track.
We’re looking to ensure the speakers work and that the sound is of the highest quality. New speaker components may take a few uses to “break-in,” so test your speakers a few times if you need to.
If all has gone well with your project, you’ll have a crisp, stunning sound that will revolutionize your home theater experience!
customized speakers
You now have everything you need to go and create customized speakers and make them the centerpiece of your home theater system. You might decide to take your customization even further or customize how you use your existing speakers, too!
How to make wired
speakers wireless

As well as customizing how your speakers look, you might also decide to make your wired speaker system wireless.
However, you might not be able to go “100% wireless,” as you might need to connect an amplifier to your speaker. Yet, you wouldn’t connect your speakers to your audio source with a wire. Instead, your audio source would transmit sound signals through the air before being processed by your speakers.
Why would you want to make wired speakers wireless?
There are several reasons, including extending the life of old speakers, saving money on purchasing a new sound system, or improving your home theater space’s aesthetics by reducing visible wires.
Here’s how you can make it happen.
The first thing you need to do is buy a wireless speaker kit.
Such a kit will usually be in the form of a Bluetooth adapter, as this is how the sound will transmit from your audio source to your speakers.
Regardless of price, they all work in pretty much the same way.
However, the higher-priced kits will generally give you better performance. If you can afford to spend more on a wireless speaker kit, then do so.
an amplifier
If you’re making old speakers wireless, you need to buy an amplifier.
This is because an unamplified wireless signal won’t produce any sound out of your speakers.
As with your wireless speaker kit, you’ll find that most amplifiers work in the same way, but you’ll get higher levels of performance the more money you spend.

Once you have settled on an amplifier, plug it in and connect it to your speakers using the RCA cables you should have got in your wireless speaker kit.
The next steps involve hooking up all your equipment.
Connect the transmitter you found in your wireless speaker kit to your amplifier using the cables also in the kit. The line should plug into the “Out” or “Stereo Out” port of your sound system.

Plug the transmitter into the mains power and disconnect speaker wires that go to any speakers you want to make wireless.
Finally, you need to connect both receivers to your speakers and your receivers to each other.
Once you’ve done this, you should be ready to go!
Ensure all elements of your speaker system are plugged in and switched on.
Switch on your TV and start watching something familiar. Listen carefully to your speakers to ensure the sound being produced is correct and of a high standard.
The indicator light on your receiver should be stable and not blinking. This tells you that your speakers are receiving and processing wireless signals. If this isn’t happening, go back through the process and make sure you’ve done everything correctly.
While the tasks can seem technical, converting your speaker system to make it wireless is a straightforward task, so long as you plug the right wires into the right places! Your wireless speaker kit and amplifiers will often contain additional instructions to help you quickly put them into action. If reading the above has inspired you to make your speaker system wireless, follow the steps and make it happen!
Customizing your sound
system to enhance your
home theater

Are you ready to get started?
Whether you want to create customized speakers to bring a further personal touch to your home theater space, or you want to cut down on how many wires you have running around your home theater, this guide has you covered.
Whether you choose to customize your speakers, make your sound system as wireless as possible, or both, we’d love to see what you come up with! Get in touch to show us the result of your customization project. Remember, we have you covered for anything else you need for your home theater space, from seats and sofas to a vast range of accessories and décor!